
If you have ever used prosumer or enterprise networking equipment, you have probably run across a switch with “smart” capabilities or VLAN capabilities. VLANs by definition is “a virtual LAN is any broadcast domain that is partitioned and isolated in a computer network at the data link layer.” VLANs allow for multiple networks and subnets to be carried across one physical network link.
Things You Will Need:
- An OpenWRT Device supporting VLANs (see here for more info) set as a DHCP client on the uplink interface
- A VLAN capable switch (buzzwords like “managed” or “smart” switch)
- A router or other device supporting 802.1q VLANs
Getting Started
Let’s say that I have a 192.168.1.0/24 network on VLAN 1 and a 10.0.1.0/24 network on VLAN 5. To make it easier, VLAN 1 will be the untagged internal network, while VLAN 5 will be the tagged public network. The public network will be able to access the internet but not be able to access VLAN 1, but VLAN 1 can access VLAN 5 and the internet.
On the switch, VLAN 1 will be untagged to the port and VLAN 5 will be tagged on the port. This will allow for the default traffic to go on the management network while allowing the public network stays on the public network.
Creating Your Interfaces
Log in to the LuCi interface on OpenWRT and navigate to Network>Interfaces. The only item right now should be the LAN network configured as a DHCP client. The OpenWRT device should have an IP address in the management network.
To create the tagged public network, click on “Add new interface” and give it a name. For the protocol, select “Unmanaged” a keep “Bridge interfaces” unselected. For the interface, specify the uplink port, i.e. eth0, and the VLAN tag. I.e. if you have VLAN 5 on eth0, the interface would be eth0.5.
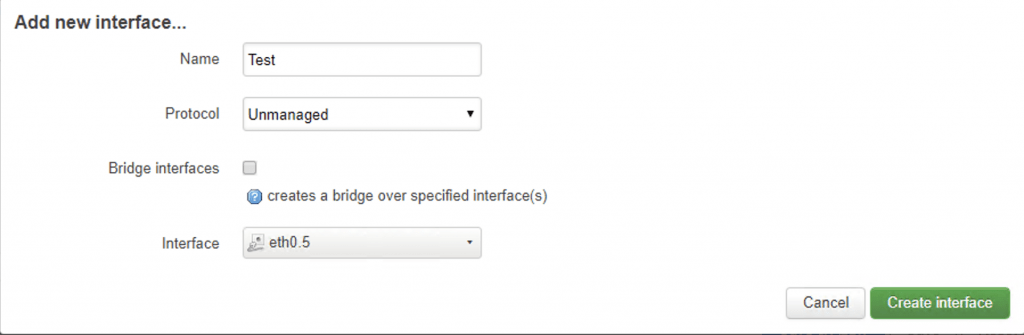
Click “Create interface” and apply the changes.
Assigning an SSID the Public Network
Let’s say that we want a public SSID titled “Public WiFi.” Navigate to Network>Wireless. Under the wireless radio for the SSID, it can be either 2.4 or 5GHz or both, select add. You will be asked to enter the SSID information.
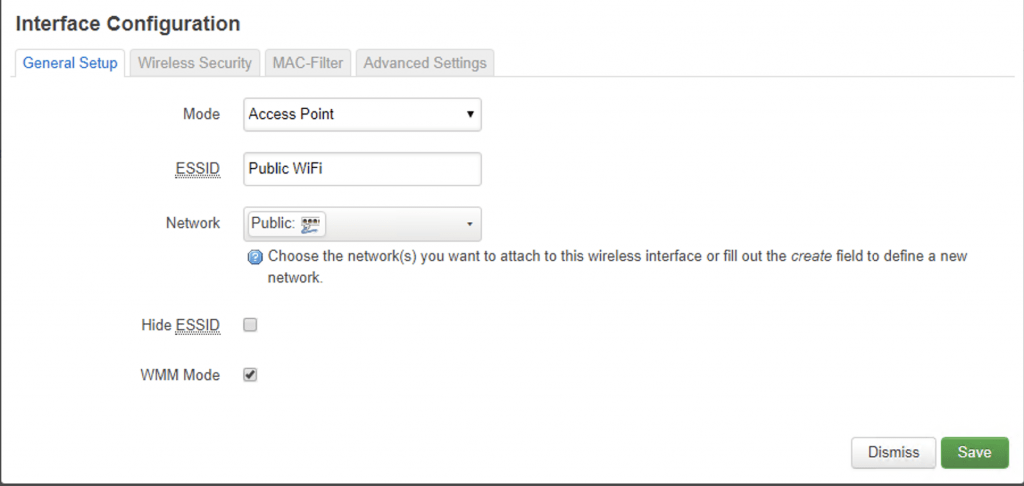
As you can see, the SSID is on the “Public” network and not the “LAN” network. Configure SSID security, if needed, and save and apply the changes. If all went well you should be able to connect to the “Public WiFi” network and receive an IP in the public network subnet. If this did not work, check your switch to see if the VLAN is properly configured on that port, and make sure it is the right VLAN.