
After receiving a T-Mobile TMOHS1 hotspot, I was left craving a little more. I hopped on eBay, searched up for an MR1100 hotspot, and found an ATT model with a bad SIM reader for ~$50! Bought it, took a small knife to the gold contacts on the reader, and pushed them up a little, and we're up and running!
I've been using the T-Mobile $10 business unlimited tablet plan, and I have read online that T-Mobile specifically blocks the IMEIs of MR1100s unless they're on specific hotspot plans. So my first step in my plan was to modify/perform magic/change/alter/etc. the IMEI.
I have gone ahead and flashed my ATT hotspot to the generic software, as I don't need the LAA feature, and I trust Netgear's firmware a little more than ATT's.
Performing "Magic"
In online forums, modifying the IMEI is typically referred to as "performing magic" on a device. Modification of the IMEI is a legal gray area in the US as you're only supposed to change the IMEI to a device you already own, i.e. a tablet. I won't be delving into how to obtain a tablet IMEI in this guide, sorry!
Regardless, let's hop right into it!
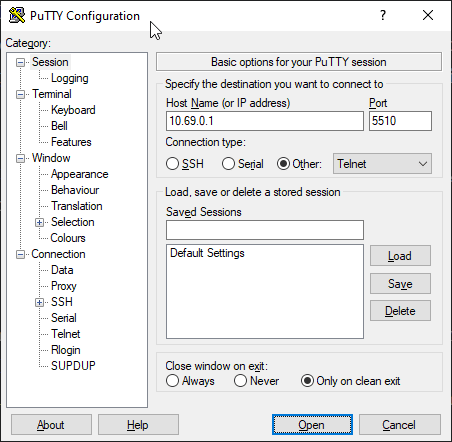
First, connect the MR1100 to your computer via USB, and use your favorite telnet client to telnet to your hotspot's IP at port 5510. Nothing will automatically display, but you should be able to type ati and get a response.
ati
ati
Manufacturer: Netgear, Incorporated
Model: MR1100
Revision: NTG9X50C_12.06.11.00 r3831 ntgrbc-fwbuild4 2020/01/24 17:46:40
IMEI: xxx
IMEI SV: 13
FSN: xxx
+GCAP: +CGSM


OK
Unlocking the Advanced Settings
We need to clone this Replit repo, as this gives us the script needed to modify the IMEI all in one place. In the Shell tab, we need to run pip3 install -r requirements.txt
~/TreasuredTornRouter$ pip3 install -r requirements.txt
Collecting pyserial
  Using cached pyserial-3.5-py2.py3-none-any.whl
Installing collected packages: pyserial
Successfully installed pyserial-3.5
WARNING: You are using pip version 21.2.dev0; however, version 22.0.4 is available.
You should consider upgrading via the '/opt/virtualenvs/python3/bin/python3 -m pip install --upgrade pip' command.
Back in PuTTY, we need to type AT!OPENLOCK? to get the string needed to get the unlock token. Copy the string to your clipboard.
AT!OPENLOCK?
1240396BFCEA38E7

OK
Now we need to enter the command ./sierrakeygen.py -l 'string' -d MDM9x50_v1, replacing 'string' with the string you copied and without quotes.
~/TreasuredTornRouter$ ./sierrakeygen.py -l 1240396BFCEA38E7 -d MDM9x50_V1
AT!OPENLOCK="BCC54829A0CBE8DE"
The output of that command is what we need to copy and paste into PuTTY to unlock the advanced settings on the device.
AT!OPENLOCK="BCC54829A0CBE8DE"
AT!OPENLOCK="BCC54829A0CBE8DE"
OK
Modifying IMEI
Next, enter AT!NVIMEIUNLOCK.
AT!NVIMEIUNLOCK
AT!NVIMEIUNLOCK
OK
Now here's where we put in our IMEI. For example, if the IMEI we want to change it to is 123456789012347, we type AT!NVENCRYPTIMEI=12,34,56,78,90,12,34,70.
AT!NVENCRYPTIMEI=12,34,56,78,90,12,34,70
AT!NVENCRYPTIMEI=12,34,56,78,90,12,34,70
OK
Type ATI to verify our changes applied, and then type AT!RESET.
ati
ati
Manufacturer: Netgear, Incorporated
Model: MR1100
Revision: NTG9X50C_12.06.11.00 r3831 ntgrbc-fwbuild4 2020/01/24 17:46:40
IMEI: 123456789012347
IMEI SV: 13
FSN: xxx
+GCAP: +CGSM

AT!RESET
AT!RESET
OK
Done!
Modifying TTL
I've read online a lot of places that claim that modifying the TTL on the MR1100 is not possible. This couldn't be further from the truth. We just need to enable the root telnet shell, and then create a script that runs on boot to masquerade the TTL.
First, we need to enable the advanced settings of the hotspot as we did above with the python script. After that, enter AT!TELEN=1, followed by AT!CUSTOM="RDENABLE", 1. Then reboot the device.
AT!TELEN=1
AT!TELEN=1
OK
AT!CUSTOM="RDENABLE", 1
AT!CUSTOM="RDENABLE", 1
OK
Now we need to open a new telnet session, this time at the standard telnet port. You should be dropped straight into a shell.
msm 202001241807 mdm9650

/ #
Now simply just enter the following commands and reboot the device!
echo "iptables -t mangle -I POSTROUTING -o rmnet_data+ -j TTL --ttl-set 64" > /etc/init.d/ttl.sh
echo "ip6tables -t mangle -I POSTROUTING -o rmnet_data+ -m hl ! --hl-eq 255 -j HL --hl-set 64" >> /etc/init.d/ttl.sh
chmod 755 /etc/init.d/ttl.sh
ln -s /etc/init.d/ttl.sh /etc/rc5.d/S98ttl
Note, I recommend after rebooting to disable the root shell telnet. This can be done by entering the advanced settings in the port 5510 telnet session and entering AT!TELEN=0andAT!CUSTOM="RDENABLE", 0, and rebooting once more.
AT!TELEN=0
AT!TELEN=0
OK
AT!CUSTOM="RDENABLE", 0
AT!CUSTOM="RDENABLE", 0
OK
Using IPv6 DNS Servers
A step up from the TMOHS1 hotspot, this one lets us specify the DNS servers for our clients. However, it will only let us use IPv4 servers...sigh. The resolv.conf file for this device is stored in /mnt/userrw/swietc/resolv.conf. So we simply create a script in /etc/init.d/customdns.sh with the contents:
#!/bin/sh

(while true
    do echo "nameserver 2606:4700:4700::1111" > /mnt/userrw/swietc/resolv.conf
    sleep 15
done) &
Make it executable:chmod 755 /etc/init.d/customdns.sh
and finally:ln -s /etc/init.d/customdns.sh /etc/rc5.d/S98customdns.