IPv6, the newest Internet Protocol. It’s meant to replace IPv4, and was even made in the 90s. However, not all ISPs have adopted it. Whether it be because of outdated equipment, a large investment is needed, or the ISP just isn’t ready, not everyone has native IPv6. Luckily this was thought of, and free services exist to remedy this issue.
Note: Using a public IPv6 tunnel may break certain websites such as Netflix, as the tunnel is considered a “proxy.” Hurricane Electric also does not allow Cloudflare inbound connections (unless you want to pay $500/month), and you will be greeted with a 522 Error on any proxied DNS entry pointing towards a HE tunnel.
Hurricane Electric
Creating Tunnel
To get started, first create an account at tunnelbroker.net. Once you have your account created, select “Create Regular Tunnel” in the “User Functions” box in the left-side.

You will be greeted with a new page asking you to fill in your current IP address and the endpoint location of your tunnel. It will display your current IP as well.


If you get the above message, your endpoint will need to allow pings from HE’s IP. You can do this by adding a firewall rule like the one below.


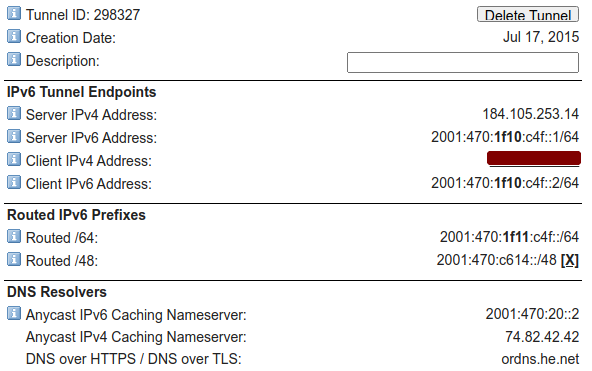
If you get the message above, continue. Make sure to pick the fastest server. You can do this by pinging the IPv4 addresses and seeing which one has the lowest latency. Think of it this way, all your IPv6 traffic will leave your pfSense box, as IPv4 packets, to a HE server, which will receive those packets and convert them to IPv6, and then route them at that server. Once you have created your tunnel, a new page will appear.

Adding Tunnel To pfSense
Once your new tunnel is created, login to pfSense and navigate to Interfaces>Assignments>GIFs. Select Add+. In the parent interface, select your WAN. In the GIF Remote Address, insert the Server IPv4 Address from above. In the GIF tunnel local address, insert the Client IPv6 address. In the GIF tunnel remote address, insert the Server IPv6 address. In the GIF Tunnel Subnet, select /64. Feel free to add a description and save the interface.

Once the GIF interface is made, navigate to Interfaces>Interface Assignments and add the new interface. Enable it and save it.
Assigning Subnet to LAN Interface
After you’ve enabled the GIF interface, you now need to assign an IPv6 address to your LAN interface or whichever one needs IPv6. Navigate to the interface settings page. Under IPv6 Configuration Type, select Static IPv6. A new section will appear below. In IPv6 address, insert the HE Routed /64 address here, with the /64 removed. Select /64 in the dropdown menu. Now save the interface and apply the changes.

Allow IPv6 Firewall Rule
Now that IPv6 is enabled on the interface, you must create a new firewall rule to allow IPv6 on the interface. This is as simple as creating a new rule, selecting IPv6, selecting any protocol, and saving the new rule.

Done!
That’s it! You’ve now enabled IPv6 on your LAN network. Now your client will not receive an IPv6 address yet. You must configure a DHCPv6 server and/or SLAAC for this. The guide listed below will show you how to do that.
Sources:

